I avoided taking a spill, but was pushed to the right, almost into the next lane over. I think the slippery road conditions may have helped keep me upright. That was the only good thing about the whole miserable ride home. I thought about calling in the idiot's cab number, but with no evidence at all and with no real damage done I didn't think there would be much point.
That was when I started thinking that it would be a great idea to have "witness" cameras mounted on my bike, one on the nose and one on the tail.
A few years later I purchased a second hand Honda CBR125R, as the little Ruckus just didn't have enough power to keep up with traffic, especially on hills, and I was constantly feeling threatened by the other drivers on the road. After another very close call with an aggressive driver overtaking me I decided to bite the bullet and invest a pair of GoPro video cameras. They work very well, though I wish I could have afforded the HD version to get a larger picture size. The only downside is that they gobble down batteries like candy, a set of good rechargeables for them run into the $25 range. Since I want to use them every single day to record my commute the batteries get worn out in about a month and a half.. replacing them at that rate would get expensive very quickly.
They come with USB cables, allowing you to copy files from the camera to your PC and to run them off of USB power. So I decided to build a 12VDC to 5VDC USB style power converter, so that I could run the cameras off of my bike's battery instead.
To build the power converter I started out using LM78M05 - 3-Terminal Positive Voltage Regulators as I'd experimented with them before and they were easily purchased from Sayal Electronics, an electronics hobby shop a few minutes drive away from home.
I looked up a circuit layout online, picked up the required components and bread-boarded it. I made two separate circuits, one for each camera, threw in a power LED, power switch and then tested it running power to it from the battery for my bike. Everything worked as planned, though the 7805's heat up like crazy!
Knowing that I'd need to dissipate that heat somehow I picked up a metal project box to contain the final circuits and tried to work out where I could position it on the bike. It would have to be somewhere it could get air flow, but also somewhere that would be at least partly protected from the weather.
No.
Maybe here, under the windscreen.
I soldered three 7805's to wires and Molex connectors, since I would need to attach them to the metal case but still wanted to be able to remove the main circuit board with minimal fuss.
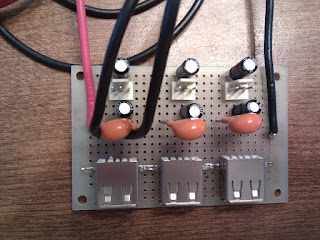
Here's the board, with all of the components attached, but not yet wired up. The three 7805's dump their output to a common + and - rail which the USB sockets patch into. This way I would, hopefully, spread the load.
Then I finished up the wiring on the back. It's a bit of a mess.
Then I got to work on the project case. After struggling with the metal case for a while I decided to switch to using a plastic one, but this required that I attach a heatsink. I bought one that's designed to go atop memory chips in a PC. Here's the case with the circuit board temporarily installed.
I also added a switch for a set of heated hand grips which I'd purchased. I would rather have wind shields on my grips, but the CBR125's handlebars don't leave enough room to mount them.
Another task was to modify the cables that came with the GoPro cameras. They included a pair of AV cables to allow the cams to be connected to a TV, but I had no use for them. I tried to find a USB tip that matched the camera's socket, but it's a proprietary design. Ugh. I took apart the stock cables and re-connected them to a pair of looooong USB extender cables, only hooking up the power and ground lines as I don't need the cables to get the videos off of the SD cards in the cams. Here's the before and after.
Here's the power converter roughly positioned on my bike. You can see a 'shoe' for the GoPro camera stuck onto the windscreen.
To get power into the converter I decided to first hook up a relay which would switch the power on and off as the bike itself is switched on and off. That way I could avoid draining the battery while the bike is parked. There are lights in the 'combination meter' which only turn on when the bike's power is on, so I decided to tap into that circuit and use it to run an automotive relay. The relay would switch on and off the converter's power from the battery.
I removed the combo meter and, after determining which wires to use, I cut them in the harness. (In retrospect I should have just stripped some of the insulation rather than cutting them.)
Then I spliced in a couple of new wires for the relay. Green is ground, brown is +12 VDC for the lights.
And hooked up the relay. It's the little black box on the right side of the combo meter, held in place with some really strong 2 sided foam tape.
Stay tuned for more in my next post.


