Started working on my e-bike's frame, chopping off a few pieces that I didn't like the looks of.
Before going at it with a hacksaw and Ryobi, I marked where I was considering taking pieces off.
Here is it, just after the initial chopping.
And after the rough cleanup. I also chopped some pieces off of the swing arm. I might remove a few more pieces, but I have other fish to fry first; I'd like to get the steering sorted and I've also started work converting the in-hub motor with cast on rim into an in-hub motor with spokes connecting it to a larger diameter rim.
Then comes the seat, electronics, battery, etc. A lot to get through before Spring.
Showing posts with label Nicom. Show all posts
2014-01-15
2012-11-05
e-bike: re-wiring part 1
Feeling that it's time to get back to work on my e-bike project, I've started work on rebuilding the electrics. This will involve two sub-projects; re-building the battery pack and stripping and re-building the wiring harness.
I've disassembled the battery and will be ordering a few bits and pieces to put it all back together again as sort of a cylinder. I'm considering putting in a fan to help with cooling and maybe a heating element for when it's cold. Like today was.. nearly froze my fingers off riding home on my motorcycle. >.<
I've stripped the wiring harness back to just the wiring necessary to make the motor work. Here's what it's trimmed back to:
[Edit: Oops.. made a mistake on that diagram. I'll upload a fixed version shortly.]
(The light grey parts are what I've chopped out.)
I've a bit of soldering to do and then I'll hook everything back up to test if it still works. It'll be very stripped back functionality wise; just a twist throttle and that's about it. Once the battery is connected it's ready to go, no key, no safety switches that detect if the brakes a pressed, no brake lights, no turn signals, no horn, no anti-theft system. Phew.
Once I'm sure I've not killed it, I'll start building my own on/off, lighting, control panel, etc. systems based on 5 volts.
I'm also planning to rebuild the motor wheel, replace the front one and do some hack and slash on the frame. This project is going to keep me busy for a while. ^_^
2012-09-15
e-bike: horn details
I've been curious about the horn on my Switch 100 since I first set eyes on it. A simple horn does not need these many wires.
I think it's probably part of the security system, a hypothesis that's supported by the way that the power on/off key switch consists of just two wires.
Lets see what's inside. A bit of prying with a wood chisel and...
The back of this board looks a bit complex for just being a speaker driver.
Hmm.. lots of diodes, resistors, a transformer and an IC of some sort. Not sure what the IC is, but it at least drives the speaker, probably has the audio data that is played by the siren and arm/disarm in it's memory. Somewhere on here is probably a motion sensor as well, perhaps as part of the IC.. I could test that by hooking it back up to the harness, arming it and poking the speaker to see if motion triggers it.
Maybe later. I've just finished stripping the whole thing back down the the frame again. I'm considering ways to strip down the frame of the bike a bit to reduce weight and to combine it with parts from the kid's bike that I picked up.
2012-08-03
e-bike: waiting...
Currently my e-bike project is on "pause" while I wait for packages to arrive and figure out how I'm going to reduce the frame weight.
Package #1 is coming from Taiwan, and is four "LM2596HV DC-DC 4.5-55V Adjustable Power Supply Converter Step-down Modules" from ProDCtoDC.com I plan to use these, perhaps in conjunction with other electronic components, to convert my battery pack's mighty DC voltage to something that won't fry the other components I want to use in my build.
Package #2 is coming from the US and is a bunch of electronics from SparkFun, including an IOIO board which I plan to use to connect via Bluetooth with an Android phone, to provide a new dashboard for the bike. I'm going to experiment with various sensors on the board & phone. I'm also planning to use the IOIO board to help with things like driving the turn signals.. I'll be replacing the stock bulbs with LEDs.
Frame-wise I'm leaning towards getting a small, portable oxy acetylene torch kit and learning to braze bike bits together. The idea being to scavenge some old, worn out (and cheap!) bike frames for useful and lighter components and assemble a new frame, something like the old one but lighter.
There's a bunch of other things I'd like to try as well: Rewinding the wheel motor to try and improve it's efficiency, rebuilding the battery pack so it's more aesthetically pleasing, vacuum mould my own plastic body panels, etc., etc.
Hopefully it will keep me amused for a while. :)
2012-07-24
e-bike: late night first ride
Finally took my bike out for a quick spin around the neighbourhood. Just kind of threw it together, bits of wire hanging out here and there, no lights or signals, bungee cords making sure the battery pack doesn't tumble out. *heh*
It was FUN!
The motor certainly has a lot of zip to it and quite a pleasingly electric sound. Vzzzzzzzzzzzziiimmmmmmmmmmmm........... :D
There are however a few problems that I've noticed which I will need to work on:
Somewhat related to this post: Last weekend I passed my M2-Exit motorcycle riding test, so I now have a full M class licence. \o/ Shopping for a new set of wheels has begun...
It was FUN!
The motor certainly has a lot of zip to it and quite a pleasingly electric sound. Vzzzzzzzzzzzziiimmmmmmmmmmmm........... :D
There are however a few problems that I've noticed which I will need to work on:
- the frame weights a SHIT TONNE. A metric Shit Tonne. Not certain how I'll address that other than perhaps making a new one. I really like the style of the bike so I would likely copy some of the frame concept that's already there.. though in a lighter material. Not certain what or how. I don't weld and have no where to do welding even if I did.
- the steering is quite dangerous. The first 10 degrees or so, left and right of center, are ok but then the weight of the bike tries to press down on the wheel and make it flop over abruptly. I think it's because the wheel forks are completely straight, with just the angle of the steering column providing any rake at all.
- the brakes are a bit intense.. but.. better too strong than weak.
- trying to pedal at anything faster than, say, 1/3rd of the motor's speed is futile and pedalling from a stop is very difficult. Some kind of adjustable gearing system might be worth looking into. The current gear set is laughably terrible in how it's put together. The transfer shaft doesn't have -any- bearings at all for example. Quality manufacturing. -.-
Somewhat related to this post: Last weekend I passed my M2-Exit motorcycle riding test, so I now have a full M class licence. \o/ Shopping for a new set of wheels has begun...
2012-07-15
e-bike: updated battery & wiring diagrams
Here are updated battery and wiring diagrams, based on things I've figured out since I posted the first set. Please delete or ignore any previous versions, thanks. :)
Download a large copy here: https://docs.google.com/open?id=0B2ihJ04Ijch5NGkzZ2pMVllMNVk
Download a PDF here: https://docs.google.com/open?id=0B2ihJ04Ijch5U21MSE9uWVJUbDA
Battery Wiring Diagram v3
Download a large copy here: https://docs.google.com/open?id=0B2ihJ04Ijch5NGkzZ2pMVllMNVk
Switch 100 Wiring Diagram v1
Download a PDF here: https://docs.google.com/open?id=0B2ihJ04Ijch5U21MSE9uWVJUbDA
e-bike: whoops part 2
I have determined why my Switch 100's motor running in reverse. Messing around with the wiring, battery and pouring over various diagrams and photos was getting me nowhere, until I spotted something in this photo:
I took this when I was disassembling the wheel hub motor - not because it needed fixing, I just wanted to poke around inside and see what was in there. The photo is of the wire order for the socket that connects the Hall Effect sensors to the controller, which I took because I had to remove the wires from the socket in order to take the wheel apart.
The important bit is that the wires coming out of the motor pass through the brake side of the wheel, and I've gone and reassembled the wheel backwards, so that the wires are coming out of the gear side instead. No wonder it's running in reverse, I've put the stator in backwards. >.<
I've taken the wheel apart and rebuilt it, and it's now running perfectly. \o/
Next I'll temporarily install the batteries into the bike frame - bungee cords and duct tape go! - and take it for a test spin, then maybe an endurance ride to determine the battery capacity.
...
In other news, I passed my M2 Exit test today, so I now have a full M class license. YAHOO! ^_^
Time to start shopping for a new motorcycle.
2012-07-08
e-bike: whoops!
During the last week I've been re-assembling my Switch 100, getting it ready for a test run to ensure that everything still runs and to determine the battery pack capacity. I'd like to know roughly how far it will get me on a charge before I try to go anywhere.
It's less-than-more together - I'm leaving a lot of cosmetic bits off - and I was test fitting the battery pack when disaster struck. Twice. Both times my own foolish fault. :(
The first incident happened when the BMS board brushed across the ends of a couple of the batteries and shorted for a millisecond. Yeep! I think (hope) that the board is all right. It stank of overheated PCB board, but I believe it was just dumping the current from one ground post to another, rather than through any of the components.
To test if it works still I put the pack onto the floor next to the assembled bike and plugged it in.
BLEEP!
Power. Lights. Woo! The pack still seems to be alive.. though I have yet to try charging it yet...
This is where the second accident happened. I gingerly tried the throttle and suddenly the bike was leaping and crashing around, sparks were flying from the battery pack, my brain nearly leapt out of my ears in shock. 0.0
It appears I have the positive and negative inverted on the pack, and this caused the bike's motor to run in reverse. When that happened the chain drive connected to the pedals caused them to start spinning and one of the pedals began "walking" along the battery pack on the floor.
Net damage to the pack is minimal. A few broken plastic bits on the orange battery frames, two of the battery sensor wires were damaged and one of the batteries had a bit of it's blue plastic sleeve torn. None of them are leaking or otherwise appear to be damaged.
So.. still feeling kind of frazzled I'm repairing the damaged sensor wires. Then I'm going to invest some time into making sure the battery ends are covered so that there won't be any more shorts. I'm also going to redo the positive and negative coming out of the battery. It looks like I had that correct in the first place.. earlier I believed that I must have had it inverted, which is why the bike wouldn't run during an earlier test.
At that time I tried flipping the battery's polarity. Still wouldn't run. Many hours later I figured out that it was because some sensor switches in the handlebar controls were fixed in the on position - they're normally off unless the rider uses the brakes - and it ran fine once I tested it with them in the off position.
Unfortunately I didn't think to check if the original polarity of the battery was correct.
Oh well. This too is a learning experience. Perhaps reading about it here will help someone else avoid a similar mistake. :)
Back to work. I'd like to do a test ride tomorrow.
2012-06-23
e-bike: wiring diagram
Since my last post about the battery pack, I've been plodding away working on making a wiring diagram for my Switch 100. Since I plan to make some changes I needed to first work out what I'm starting with.
[ Image Removed ]
Here's a 'beta' version of the diagram:
You can also download a PDF version here: [ Link Removed ] I recommend viewing it at 200% size.
It's still beta though, as I want to go over everything again to make sure I have the connections worked out correctly.. there are a couple I'm not certain of. If you own a Switch 100 (or one of it's many named siblings) and wouldn't mind taking some detailed photos of the wiring on the Brushless Motor Controller, that would certainly help.
I thought I had.. turns out I didn't. -.-
2012-06-12
e-bike: battery build, interlude
Just a quick note: I've tested the battery pack out on my e-bike.. or rather the eviscerated electronics from my e-bike.. and it works! Powers the lights, the motor and the LOUDEST gods bedamned theft alarm I've ever had go off right next to me.
That bloody thing is getting modded ASAP. >.<;
Woo! Next steps will not involve the battery pack, so "part 3 of 3" will be a while. I plan to rebuild the pack with making it pretty in mind, as I would like to make it visible through the bike's shell. Those blue cells are just to nice looking to hide. 8)
More later.
2012-05-29
e-bike: batteries!
My shipment of LiFePO4 batteries has arrived from China.
16 batteries, metal bars for connecting them up, plastic framework for supporting them, Battery Management System, wires and a charging unit. The charger came with a European style plug, but I have a bunch of spare monitor power cables that will do the job.
They are BIG batteries!
But all together they should weight less than the four dead SLA batteries that the bike came with.
2012-05-21
e-bike: handlebar controls
First mod on my e-bike has been to change the colour of the control switches on the handlebars. Look at those original colours...
Eugh! Like the controls off of some kiddie's toy electric truck or something. Far too jolly and candy-like for my tastes. If it had just been red or just blue I could've lived with it, but not both.
After disassembly (quite the mess of bits inside these things!) and a light sanding I tried soaking the buttons in liquid Rit dye. Other people have reported good success in dying plastics this way, but it didn't do more than lightly stain the white button in the center of the turn signal switch.
So I bought some Rust-oleum Universal Advance Formula spray paint. A coat, some light sanding, and another coat did the trick.
It was a pain in the butt putting everything back together again. Made me wish I'd paid closer attention when taking it apart. Here they are now...
Ahhh.. much better. Much more sombre. ^_^
"But Andrew, how will you see the controls?" If I needed to look down in order to use one of the controls, it just means that I should spend more time memorizing their layout. Fortunately the layout of the controls roughly matches what I have on my CBR 125.
e-bike
I've added a new project to the pile of things I'm mucking around with: Building a hybrid e-bike.
A while back I saw a "
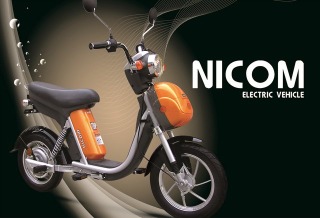
Zhejiang Nicom Electric Vehicle" or e-bike parked on the street out front of the Princess of Whales Theatre in Toronto. I liked the look of it and though I don't need an e-bike, I thought it would cool to have one.
These bikes are sold under a wide variety of brand names; Switch 100, Top Prince, E-Road, Sprinter, Motorino VTS, Celtic Beetle, ezcruzr, etc. The result of various e-bike retailers importing it, and other e-bikes, from China and slapping their own brand onto them.
After joining the Toronto Electric Riders Association forum to brush up on my e-bike knowledge I checked out the prices for new Nicom bikes - decided that over $1000+ was too much - and started snooping around on Kijiji and Craig's List for anyone selling a used one. I found a 2010 "Switch 100" going for $400 so I drove out to have a look.
Fortunately the SLA (Sealed Lead Acid) battery pack was so worn out that the bike could only move under pedal power, so the seller readily agreed to $300 for it as-is. Perfect for a bike that I was planning to strip and rebuild anyway.. fixing a little rust and having to rejuvenate or replace the battery pack would be part of the fun. ^_^
I'd brought along my tool box and was able to quickly partially disassemble the beast and cram it into my smart car. (Only breaking one of the bike's mirrors in the process.)
The one thing that really impressed me about this bike is how HEAVY it is. >.< The battery pack, frame and motor wheel are just massively heavy. I am going to put it on a diet.
After driving home and drafting my husband into helping me haul the heaviest bits into the basement, I finished stripping it down to the frame.
And investigated the battery pack, which turned out to contain four batteries crammed inside of the plastic case. Unfortunately for my "rejuvenate" plans they turned out to be gel based SLA batteries, which do not respond well to desulphination circuits and they were also too far gone for desulphination to make much of a difference. C'est la vie. Off to recycling the went.
Which leaves me having to buy a new pack.. perhaps the most expensive part of an e-bike. Ouch. But I kind of expected this to happen.. if you're picking up a 2nd hand e-bike you can be pretty sure that the original owner is getting rid of it 'cause the batteries are kaput and they're put off by the cost of getting new batteries for it. I imagine we'll see much the same trend in the future with electric cars.
Would you want to spend $$$ on a new engine for your 5 year old car, or invest that into a new vehicle instead?
I decided against going for the cheap option of just buying a fresh set of SLA (apx. $200+) and decided to get lithium iron phosphate (LiFePO4) instead. Just about any e-bike dealership also sells battery packs, that being the first part of an e-bike that needs replacing, so I thought it wouldn't be difficult to find someone selling a ready-made pack for my bike.. and I'd also need a new charger since the one for lead acid batteries wouldn't work with the different chemistry.
But after looking around I couldn't find anyone selling a battery pack that looked plug-n-play for my bike. Which I suppose isn't that surprising since there are a lot of different e-bikes on the market and trying to keep a bespoke pack for each model on hand would be a bit of a logistical nightmare.
While browsing around various e-bike maintainance and tech sites I came across this page which shows a LiFePO4 battery pack being made inside of the plastic battery case from a Switch 100.
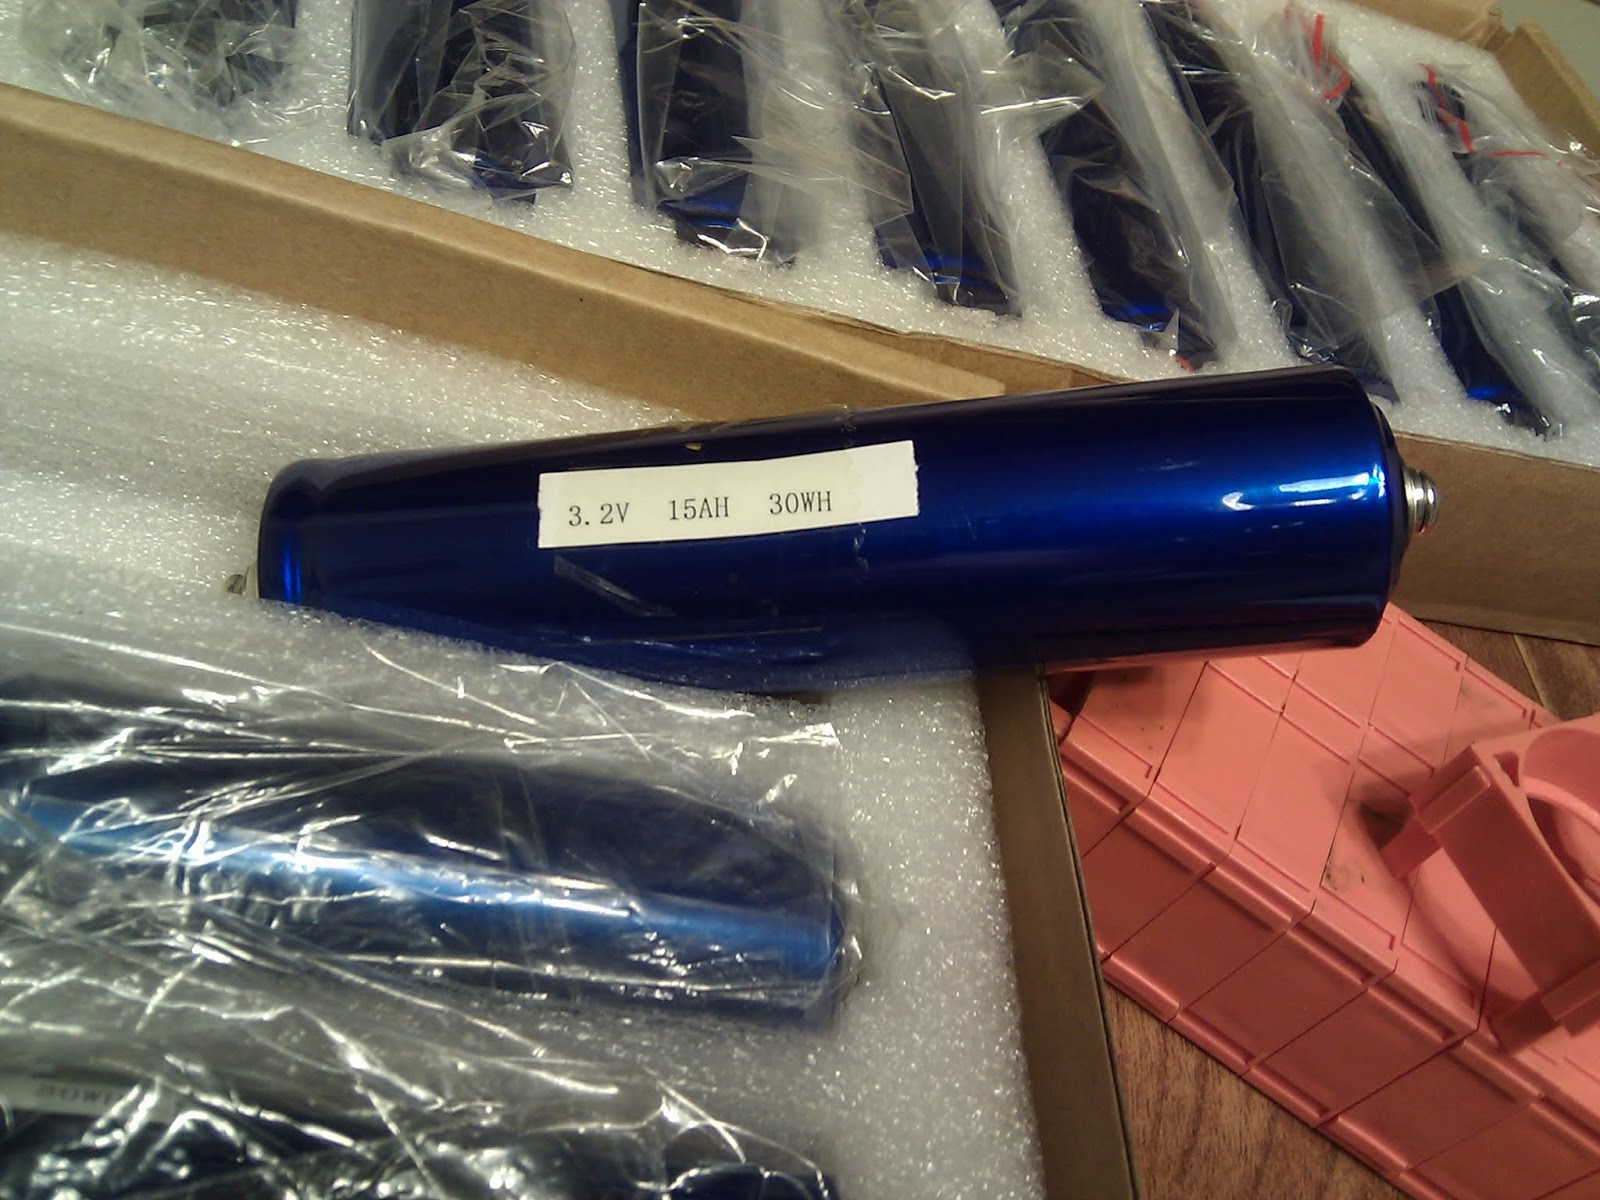
After some more hunting around I found a few different retailers of those big blue Headway batteries and kits for assembling different sizes of battery packs - such as Headway Headquarters - with prices that varied considerably. I noticed that the US places tended to charge quite a bit more for the batteries, and though they would be less for shipping if I lived in the US, I'm Canadian, so it made more sense to buy from China.
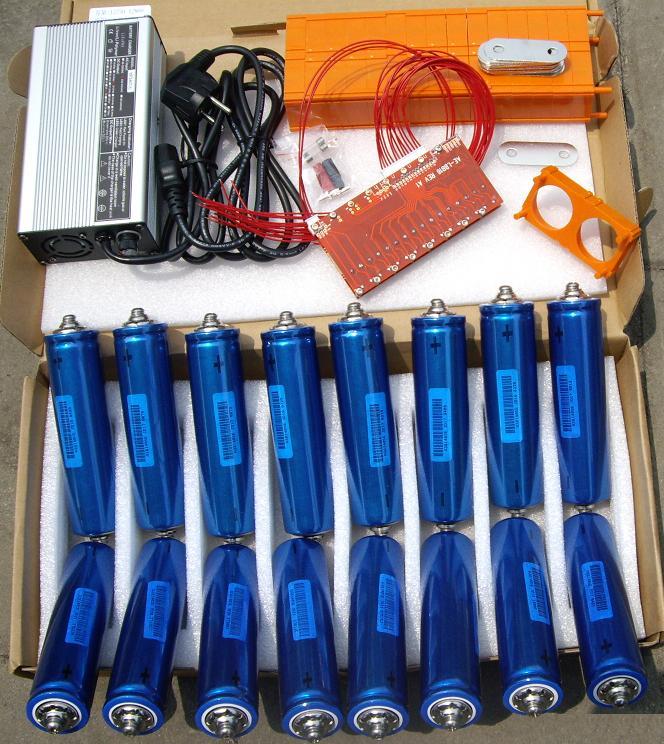
That's what I've done; just over $675 for a 48v 15Ah battery pack kit from ev assemble via their eBay store.
It will have the batteries, BMS (Battery Management System), charger and various bits and pieces for assembling the batteries into a pack. Should be fun to put together. ^_^
Yes.. this means I've nearly spent as much on a two year old rust bucket as I could've spent on a new bike.. which probably doesn't make any sense to some people. It does to me for a few reasons: That new bike price would be for one with a SLA battery pack, which only last a couple of years, whereas this LiFePO4 cell should have a much longer life and be a fair bit more powerful as well, extending the bike's range. In addition I'll end up with a custom bike that is unique, and an expression of my creativity. I'm also reducing waste by taking something that otherwise might have been discarded or recycled and making it useful again. Finally it's just fun to do this.. mucking around with the guts of some old heap and bringing it back to life again. It's a hobby. It doesn't need to make money or sense.
While I wait for the batteries to arrive I've begun cleaning up the rest of the bike.
I hope no one minds bike parts in the shower...
Subscribe to:
Posts (Atom)